Make sure to save your character sheet often to avoid losing your work! You can save your sheet using the Save Page link.
### Step 2 • Overview & The Basics The first section of the character sheet is the **Overview**. In this section you will upload your character's portrait and provide a brief synopsis about your character. This overview does not need to be long but should provide other players with a general idea about who your character is, why they are in Baltimore and any other important information that might be relevant. Your character's portrait should be 250px wide by 250px tall. The JPG format is preferred. To upload your character's portrait, select the image on the character sheet (1) then click the image icon on the toolbar (2):  This will launch the image manager. From here drag an image into the upload section or simply click on it (1) to launch the file picker. When your image is uploaded, select it from the gallery (2) and then click on select image (3): 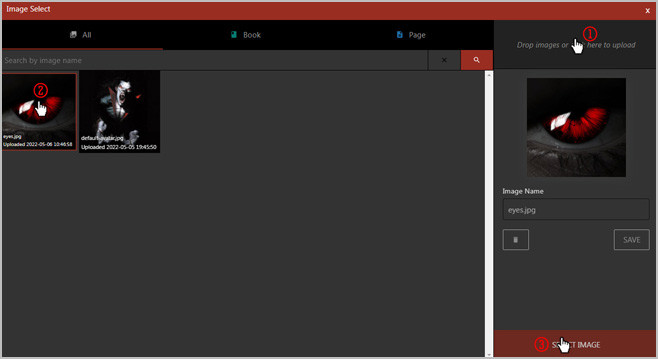 The second section - The Basics - contains some general information about your character. Complete each section as follows:| **Name** | Your characters name (generally Firstname Lastname) |
| **Player** | Your Discord nickname used on the RHC Server |
| **Chronicle** | Baltimore After Dark |
| **Nature** | Your character's 'true' personality. |
| **Demeanor** | How your character presents themselves. |
| **Concept** | Remember that one or two word concept you thought of earlier? Put that here! |
| **Clan** | Your character's clan. |
| **Generation** | Starts at 13th. Can be lowered through the Generation background, or raised through Flaws. |
| **Sire** | The name of your character's sire (if known). |
When entering text into longer text areas, use CTRL-ENTER to enter a new line.
### Step 3 • Attributes Attributes are divided into three (3) categories: Physical, Social and Mental. During this step, prioritize your attribute categories as Primary, Secondary and Tertiary; record this choice by marking each category on your sheet with a P, S, or T. Your character begins with one (1) dot in each attribute. Assign dots to each of your attribute categories according to the following chart:| Kindred Tier | Primary | Secondary | Tertiary | Notes |
|---|---|---|---|---|
| Fledgeling | 7 dots | 5 dots | 3 dots | |
| Neonate | 7 dots | 5 dots | 3 dots | |
| Ancilla | 8 dots | 6 dots | 4 dots | |
| Elder | 9 dots | 7 dots | 5 dots |
You can modify the dots on your sheets by using '1' for a filled in dot and '0' for an empty dot. For example to set an attribute to 3 or 11100 you would enter '11100'.
No Attribute may exceed 5.
### Step 4 • Abilities Abilities are divided into three (3) categories: Talents, Skills and Knowledge. During this step, prioritize your attribute categories as Primary, Secondary and Tertiary; record this choice by marking each category on your sheet with a P, S, or T. Your character begins with zero (0) dots in each attribute. Assign dots to each of your ability categories according to the following chart:| Kindred Tier | Primary | Secondary | Tertiary | Notes |
|---|---|---|---|---|
| Fledgeling | 13 dots | 9 dots | 5 dots | |
| Neonate | 13 dots | 9 dots | 5 dots | |
| Ancilla | 14 dots | 10 dots | 6 dots | |
| Elder | 15 dots | 11 dots | 7 dots |
You can modify the dots on your sheets by using '1' for a filled in dot and '0' for an empty dot. For example to set an attribute to 3 or 11100 you would enter '11100'.
No single Ability may go above three dots at this time. During the Freebies and Experience phase, abilities may be raised up to the Generation maximum.
### Step 5 • Advantages ##### Clan Disciplines Record and assign dots to Clan Disciplines according to the chart below. Clan Disciplines should me marks with an \* on your sheet. You can assign these dots in any combination (1 dot in three Clan Disciplines, 3 dots in one Clan Discipline, etc.).| Kindred Tier | Dots | Notes |
|---|---|---|
| Fledgling | 3 | |
| Neonate | 3 | |
| Ancilla | 4 | |
| Elder | 5 |
| Kindred Tier | Dots | Notes |
|---|---|---|
| Fledgling | 6 | |
| Neonate | 6 | |
| Ancilla | 7 | |
| Elder | 8 |
You must purchase the Generation background for any character less than 13th generation.
For Backgrounds that require additional information (e.g. Allies, Contacts, etc.) please be sure to fill out the Expanded Background section. ##### Virtues For characters on the Path of Humanity: The Path of Humanity has three Virtues: Conscience, Self-Control, and Courage. Edit your sheet to reflect this (e.g. delete Instinct and Conviction). The three Virtues begin with one free dot each. Assign 7 dots among these Virtues ensuring that no Virtue exceeds 5 dots. For characters on a Path other than Humanity: Your chosen Path may use Conviction instead of Conscience or Instinct instead of Self-Control. Edit your sheet to reflect the names of your Path's Virtues (e.g. if it using Instinct, delete Self-Control). Conscience, Self-Control, and Courage begin with one free dot each, but Conviction and Instinct start at zero dots. Assign 7 dots among your Path's three Virtues ensuring that no Virtue exceeds 5 dots. ##### Humanity/Path If your character is on a Path other than Humanity, record the Path name in the Path field along with the Path's Bearing. Record your Humanity or Path score which is equal to `Conscience/Conviction + Self-Control/Instinct`.You can modify the dots on your sheets by using '1' for a filled in dot and '0' for an empty dot. For example to set your Humanity to 6 or 11111 10000 you would enter '11111 10000'.
##### Willpower Record your permanent Willpower (circular dots) which is equal to `Courage`.You can modify the dots on your sheets by using '1' for a filled in dot and '0' for an empty dot. For example to set your permanent Willpower to 6 or 11111 10000 you would enter '11111 10000'.
##### Blood Pool Record your starting Blood Pool and Blood Per Turn according to the Generational maximums:| Generation | Maximum Blood Pool | Blood Per Turn | Notes |
|---|---|---|---|
| 7th | 20 | 4 | |
| 8th | 15 | 3 | |
| 9th | 14 | 2 | |
| 10th | 13 | 1 | |
| 11th | 12 | 1 | |
| 12th | 11 | 1 | |
| 13th | 10 | 1 | |
| 14th | 10 | 1 | See the [Flaw: Fourteenth Generation](https://redhandchronicles.com/link/26#bkmrk-fourteenth-generatio) |
| 15th | 10 | 1 | See the [Flaw: Fifteenth Generation](https://redhandchronicles.com/link/26#bkmrk-fifteenth-generation) |
| Category | Cost | Notes |
|---|---|---|
| Ability | 2 per dot | |
| Attribute | 5 per dot | |
| Background | 1 per dot | |
| Discipline | 7 per dot | |
| Humanity | 2 per dot | |
| Specialty | 1 dot | Maximum 3 per Attribute or Ability |
| Virtue | 2 per dot | |
| Willpower | 1 per dot |
Any points not spent at this time are lost.
### Step 8 • Specialties For each Attribute or Ability above 3, you may select a Specialty for it. Record this specialty next to the Attribute or Ability:  ### Step 9 • Experience Points You may now spend Starting Experience Points. Record your total Starting Experience Points on your character sheet according to your Kindred Tier:| Kindred Tier | Age - Torpor Period | XP | Notes |
|---|---|---|---|
| Fledgling / Neonate | 1-50 | 15 | |
| 50-100 | 35 | ||
| Ancilla | 101-150 | 75 | |
| 151-200 | 110 | ||
| 201-250 | 160 | ||
| 251-299 | - | To be determined in discussion with staff. | |
| Elder | 300+ | - | To be determined in discussion with staff. |
| Category | Cost | Notes |
|---|---|---|
| New Ability | 3 | |
| New Background | 3 | |
| New Discipline | 10 | |
| New Path | 7 | Necromancy or Thaumaturgy |
| New Specialty | 3 | 1 Free Specialty with an Attribute or Ability at 4+; Maximum 3 per Attribute or Ability |
| Attribute | Current Rating × 4 | |
| Ability | Current Rating × 2 | |
| Background | Current Rating × 2 | |
| Clan Discipline | Current Rating × 5 | Caitiff have no Clan Disciplines. The cost for a Caitiff to raise all Disciplines is the Current Rating × 6. |
| Other Discipline | Current Rating × 7 | |
| Secondary Path | Current Rating × 4 | Necromancy or Thaumaturgy |
| Virtue | Current Rating × 2 | Increasing a Virtue through experience does not increase traits based on that Virtue (Humanity, Path, Willpower) |
| Willpower | Current Rating |
Any Experience Points spent at this time are remain available for your character to spend later in play.
### Step 10 • Rounding Out Fill out the Rights & Possessions section, detailing any gear, equipment or vehicles of note, along with information about your character's feeding grounds and haven(s) if applicable. Provide a description of your character by completing the provided traits along with a few words on how they look and usually dress in the text box. Provide your character's backstory in the history section. This does not have to be exhaustive! A succinct description of key events is all that is required - can even be in bullet form. #### Tags If applicable, you should tag your character sheet using the tag feature. Te following tags should be set: - Sect • Camarilla, Sabbat or Independent) - Clan • Your character's clan - Player • Your Discord nickname used on the RHC Server - Face Claim • If you use a real life face claim, tag them by name using the format `Firstname Lastname` ### Step 11 • Submission When you are happy with your character sheet you can submit it for review by Staff. To do so, please post in the ***#character-submission*** channel on the Discord Server including a link to your character sheet. Staff will endeavor to review your sheet within 24 hours. If the review process might take longer, or there are potential issues with your sheet, Staff will contact you via Discord.